
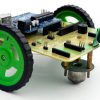

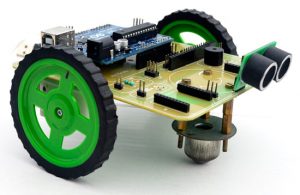
Android controlled arduino robot car
Call for Price
Android controlled arduino robot car
Description
Android controlled arduino robot car make use of an Android mobile phone for robotic control with the help of HC-05 Bluetooth technology. This is a simple robotics projects using arduino microcontroller. This project is a bluetooth controlled robot. For this the android mobile user has to install an application on her/his mobile. This android application could be downloaded in the android market.
Then user needs to turn on the bluetooth in the mobile. The wireless communication techniques used to control the robot is bluetooth technology. User can use various commands like move forward, reverse, stop move left, move right. These commands are sent from the Android mobile to the bluetooth receiver which is interfaced with the Arduino robot.
Android based robot has a HC-05 Bluetooth receiver unit which receives the commands and give it to the microcontroller circuit to control the motors. The microcontroller then transmits the signal to the motor driver IC’s to operate the motors.
Materials used
☞Robo Car
☞Arduino Uno
☞HC-05 Bluetooth Bee Module
☞Android Mobile Phone

Circuit diagram to interface Freeduino with Motor and bluetooth Bee

Video Demo for Android controlled arduino robot car
/         Android Based Robot Car                   //

//         Interface  : HC-05 Bluetooth              //

//         Powered by Pantech Prolabs India Pvt Ltd  //


#define BAUDRATE 9600


const int MotR_A = 3;

const int MotR_B = 5;

const int MotL_A = 6;

const int MotL_B = 9;

byte GetValue;

void setup()

{

  Serial.begin(BAUDRATE);

  pinMode(MotR_A, OUTPUT);

  pinMode(MotR_B, OUTPUT);

  pinMode(MotL_A, OUTPUT);

  pinMode(MotL_B, OUTPUT);

}

byte ReadOneByte()           // One Byte Read Function

{

  int ByteRead;

  while(!Serial.available());

  ByteRead = Serial.read();

  return ByteRead;

}

void loop()

{

    GetValue = ReadOneByte();

    switch(GetValue)

    {

       case 'L':

           Robot_Left();

           break;

        case 'R':

           Robot_Right();

           break;

        case 'F':

           Robot_Forword();

           break;

        case 'B':

           Robot_Reverse();

           break;

        case 'G':

           Robot_Forword();

           break;

        case 'S':

           Robot_Stop();

           break;

    }

}

  void Robot_Forword()

 {

    digitalWrite(MotR_A, LOW);

    digitalWrite(MotR_B, HIGH);

    digitalWrite(MotL_B, LOW);

    digitalWrite(MotL_A, HIGH);

 }

  void Robot_Reverse()

 {

    digitalWrite(MotR_A, HIGH);

    digitalWrite(MotR_B, LOW);

    digitalWrite(MotL_B, HIGH);

    digitalWrite(MotL_A, LOW);

 }

   void Robot_Right()

 {

    digitalWrite(MotR_A, HIGH);

    digitalWrite(MotR_B, LOW);

    digitalWrite(MotL_B, LOW);

    digitalWrite(MotL_A, HIGH);

 }

    void Robot_Left()

 {

    digitalWrite(MotR_A, LOW);

    digitalWrite(MotR_B, HIGH);

    digitalWrite(MotL_B, HIGH);

    digitalWrite(MotL_A, LOW);

 }

     void Robot_Stop()

 {

    digitalWrite(MotR_A, LOW);

    digitalWrite(MotR_B, LOW);

    digitalWrite(MotL_B, LOW);

    digitalWrite(MotL_A, LOW);

 }
Source code for Android controlled Arduino robot car
Android Application Link,
https://play.google.com/store/apps/details?id=eu.jahnestacado.arduinorc&hl=en
Arduino bluetooth Controller
This android application can establish a connection with any Arduino/microcontroller project that involves a HC-05 Bluetooth Module. This App allows the user to set a UUID of his own bluetooth module in order to connect the android application with his projects. The default UUID that comes with this application is for the HC-06 Wireless Serial 4 Pin bluetooth RF Transceiver Module RS232. (If you use default UUID in order to pair the BT module with your smartphone for the first time, you will have to give a 4-digit password. This password is ‘1234’.)
The application is comprised of 4 Command Modes:

1. Vehicle Mode : By pressing the “joystick” button the user can remote control a vehicle with specific gestures. For the interpretation of gestures to commands, the application uses the built-in accelerometer sensor of the smart device. There are 8 different gestures available FRONT
☞BACK
☞LEFT
☞RIGHT
☞FRONT_LEFT
☞FRONT_RIGHT
☞BACK_LEFT
☞BACK_RIGHT
You can set these gestures with your own custom commands through the the menu button “Set Commands”.Additionally, there is a STOP and an ANDROID button that can be assigned with custom commands as well.
***IMPORTANT*** The mode provides via the menu options the option to change the orientation of accelerometer axises (X->Y, Y->X) in order to operate properly in Android phones with different default orientation.
Moreover, menu options provide a sensitivity change button to modify the point where the app catches the gesture events for this mode. As the title suggests, this mode is specifically designed to remote control a vehicle which uses a bluetooth module and a microcontroller.
2. Fader Mode : This mode provides the user with a fader-seekbar that can send commands from 0-9 and allow the user to experiment with servos, leds, motors and many more.
3. Controller Mode : This mode provides a standard controller layout with 10 buttons in total that can be assigned with custom commands. The arrow buttons are specifically designed to send commands continuously while pressed, in order to simulate an actual controller.
4. Terminal Mode : This mode provides a terminal-like interface in which the user can type and send an individual or multiple commands which will execute sequentially. Since Arduino serial port receives one byte at a time, if the user types a string in the input text field, the application divides that string into characters and sends them one by one to Arduino. It should be noted that spaces or empty strings are skipped.
The current project uses only Vehicle Mode

Additional information
| Weight | 1.000000 kg |
|---|
Related products
-
-
Read more

- Robotics Projects
Obstacle Avoidance Robot
- Call for Price
-

-
-
- Read more

- Projects, Robotics Projects
Anomaly Detection using Drone
- Call for Price
-
- Read more
- Projects, Robotics Projects
Forest Fire Detection using Drone
- Call for Price
Reviews
There are no reviews yet.