

IoT Based Humidity and Temperature Monitoring Using Arduino Uno
Call for Price
IoT BASED HUMIDITY AND TEMPERATURE MONITORING USING ARDUINO UNO
Description
Introduction
Using Internet of Things (IOT), we can control any electronic equipment in homes and industries. Moreover, you can read a data from any sensor and analyse it graphically from anywhere in the world. Here, we can read temperature and humidity data from DHT11 sensor and upload it to a ThingSpeak cloud using Arduino Uno and ESP8266-01 module. Arduino Uno is MCU, it fetch a data of humidity and temperature from DHT11 sensor and Process it and give it to a ESP8266 Module.ESP8266 is a WiFi module, it is one of the leading platform for Internet of Things. It can transfer a data to IOT cloud.
Demonstration Video
Hardware Requirements
- Arduino Uno
- ESP8266-01
- DHT11
- AMS1117-3.3V
- 9V battery
Software Requirements
- Arduino IDE

Circuit and Working
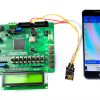
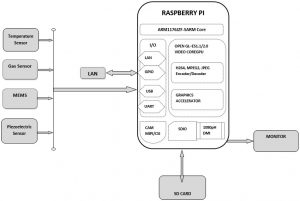
First make the connection as shown in fig: 1.1.The 2nd pin is of DHT11 is a data pin, it can send a temperature and humidity value to the 5th pin of Arduino Uno.1st and 4th pin of DHT11 is a Vcc and Gnd and 3rd pin is no connection. The Arduino Uno process a temperature and humidity value and send it to a ESP8266 WiFi module. The Tx and Rx pin of ESP8266 is connected to the 2nd (Rx) and 3rd (Tx) of Arduino Uno. Make sure that input voltage of ESP8266 must be 3.3V, not a 5V (otherwise it would damage a device).For that, we are using AMS1117 Voltage regulator circuit. It can regulate a voltage from 9V to 3.3V and will give it to Vcc pin of ESP8266.The Ch_Pd is a chip enable pin of ESP8266 and should be pullup to 3.3V through 3.3KΩ resistor. For reset the module pull down the RST pin of ESP8266 to Gnd.ESP8266 have 2 GPIO pins GPIO 0 and GPIO 2.

Fig: 1.1 Circuit diagram for monitoring Humidity and Temperature in IOT cloud
Construction and Testing
ThingSpeak is an open source platform to store and retrieve a data for Internet of Things application. To use this, you need to register in ThingSpeak cloud and then login to your account. After create a new channel with temperature in one field and humidity in another field as shown in Fig: 1.2. Once you created a new channel, it will generate a two API keys, they are READ API keys and WRITE API keys. First, copy the WRITE API keys from ThingsSpeak and paste it into the line (String apiKey = “OX9T8Y9OL9HD0UBP”;) of the program. Next, replace the Host_Name and Password with your WiFi name and WiFi password in the two lines given below in the program. (String Host_Name = “Pantech” and String Password = “pantech123”)
The Arduino program Uses DHT library, if it is not presented in your arduino IDE, select SketchàInclude libraryàManage librariesàInstall DHT Sensor library. Then compile the program and upload to a Arduino Uno through Arduino IDE. Ensure that WiFi modem and internet connection in your Smartphone or PC are working properly. After uploaded a program, the Temperature and Humidity data is uploaded on ThingSpeak platform. You can see it graphically in the private view window of your channel as shown in Fig: 1.3. And you can able to see the uploaded data from serial port of Arduino IDE.

Fig: 1.2: Creating new channel on ThingSpeak cloud

Fig: 1.3: Graphical representation of Humidity and Temperature data
Arduino code
#include "DHT.h"

#include

#define DHTPIN 5                       // Digital Pin 5

#define DHTTYPE DHT11                  // We are Using DHT11

String apiKey = "OX9T8Y9OL9HD0UBP";    // Edit this API key according to your Account

String Host_Name = "Pantech";         // Edit Host_Name

String Password = "pantech123";          // Edit Password

SoftwareSerial ser(2, 3);              // RX, TX

int i=1;

DHT dht(DHTPIN, DHTTYPE);              // Initialising Pin and Type of DHT

void setup() {

Serial.begin(115200);                  // enable software serial

ser.begin(115200);                     // reset ESP8266

ser.println("AT+RST");               // Resetting ESP8266

dht.begin();                        // Enabling DHT11

char inv ='"';

String cmd = "AT+CWJAP";

       cmd+= "=";

       cmd+= inv;

       cmd+= Host_Name;

       cmd+= inv;

       cmd+= ",";

       cmd+= inv;

       cmd+= Password;

       cmd+= inv;

ser.println(cmd);                    // Connecting ESP8266 to your WiFi Router

  }

// the loop

void loop() {

  int humidity =  dht.readHumidity();             // Reading Humidity Value

  int temperature = dht.readTemperature();        // Reading Temperature Value

  String state1=String(humidity);                 // Converting them to string

  String state2=String(temperature);              // as to send it through URL


  String cmd = "AT+CIPSTART=\"TCP\",\"";          // Establishing TCP connection

  cmd += "184.106.153.149";                       // api.thingspeak.com

  cmd += "\",80";                                 // port 80

  ser.println(cmd);

  Serial.println(cmd);

 if(ser.find("Error")){

    Serial.println("AT+CIPSTART error");

    return;

  }

String getStr = "GET /update?api_key=";         // prepare GET string

  getStr += apiKey;

  getStr +="&field1=";

  getStr += String(state1);                       // Humidity Data

  getStr +="&field2=";

  getStr += String(state2);                       // Temperature Data

  getStr += "\r\n\r\n";

  cmd = "AT+CIPSEND=";

  cmd += String(getStr.length());                // Total Length of data

  ser.println(cmd);

  Serial.println(cmd);


if(ser.find(">")){

    ser.print(getStr);

    Serial.print(getStr);

  }

  else{

    ser.println("AT+CIPCLOSE");                  // closing connection

    // alert user

    Serial.println("AT+CIPCLOSE");

  }

 delay(1000);                                  // Update after every 15 seconds

}
Other Applications
We can also include a sensor like gas, infrared, ultrasonic sensors based on their requirements. Moreover, it is possible to control the relay, actuators through internet once a sensor values are going above/below predetermined values.
Additional information
| Weight | 1.000000 kg |
|---|
Related products
-
-
Add to cart
- IoT Projects, Projects
IoT based Health Monitoring System using Arduino
- ₹11,000.00 Exc Tax
-
-
-
Reviews
There are no reviews yet.