How to Interface I2C-EEPROM with 8051 Advanced Development Board
The 8051 Advanced Development board is specifically designed to help students to master the required skills in the area of embedded systems. The kit is designed in such way that all the possible features of the microcontroller will be easily used by the students. The kit supports in system programming (ISP) which is done through serial port.
NXP’s 8051 (AT89V51RD2), 8051 Kit Advanced Development board is proposed to smooth the progress of developing and debugging of various designs encompassing of speed 8-bit Microcontrollers.
I2C (Inter Integrated Circuit)
The I2C (Inter-IC) bus is a bi-directional two-wire serial bus that provides a communication link between integrated circuits (ICs).I2C is a synchronous protocol that allows a master device to initiate communication with a slave device. Data is exchanged between these devices.
EEPROM
EEPROM (electrically erasable programmable read-only memory) is user-modifiable read-only memory (ROM) that can be erased and reprogrammed (written to) repeatedly through the application of higher than normal electrical voltage. It is a type of non-volatile memory used in computers and other electronic devices to store small amounts of data that must be saved when power is removed, e.g., calibration tables or device configuration.
Interfacing I2C – EEPROM
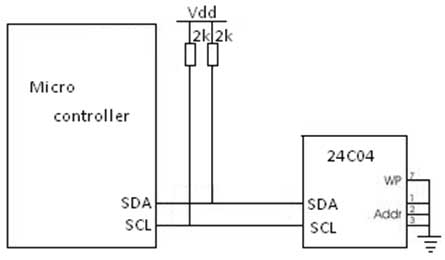
Fig. 1 shows how to interface the EEPROM with microcontroller through I2C. I2C is a Master-Slave protocol. I2C has a clock pulse along with the data. Normally, the master device controls the clock line, SCL. This line dictates the timing of all transfers on the I2C bus. No data will be transferred unless the clock is manipulated. All slaves are controlled by the same clock, SCL.
I2c bus supports many devices, each device is recognized by a unique address—whether it’s a micro-controller, LCD Driver, memory or keyboard interface and can operate as transmitter or receiver based on the functioning of the device. The controller designed controls the EEPROM device through I2C protocol. The I2C Controller here acts as a master device and controls EEPROM which acts as a slave. The read-write operations are accomplished by sending a set of control signals including the address and/or data bits. The control signals must be accompanied with proper clock signals.
Interfacing I2C – EEPROM with 8051
We now want to Read, write and Erase EEPROM by using I2C in 8051 Advanced Development board. Wiring up an I2C based EEPROM to the I2C port is relatively simple. The basic operation of the I2C based EEPROM‘s is to send a command, such as WRITE, followed by an address and the data. In WRITE operation, the EEPROM to store the data.
In 8051 Advanced Development Kit, 2 nos. of EEPROM lines are controlled by I2C Enabled drivers. I2C Lines serial clock SCL (P2.6), serial data SDA (P2.7) connected to the I2C based serial EEPROM IC. The EEPROM read & write operations are done in 8051 Advanced Development Kit by using these SDA & SCL I2C lines.
Pin Assignment with 8051
Circuit Diagram to Interface I2C–EEPROM with 8051
Source Code
The Interfacing I2C – EEPROM with 8051 program is very simple and straight forward that read, write and erase operations in EEPROM by using I2C & the value is displayed in serial port. A delay is occurring in every single data read or write in EEPROM. The delay depends on compiler how it optimizes the loops as soon as you make changes in the options the delay changes.
C Program to I2C – EEPROM Display using 8051
#include

#include

#include

#define ACK1

#define NO_ACK0 unsigned char i;

unsigned char EData[5];

unsigned char Data;

void InitSerial(void);

void DelayMs(unsigned int);

void WriteI2C(unsigned char);

void Start(void); void Stop(void);

void ReadBYTE(unsigned int);

void WriteBYTE(unsigned int);

unsigned char ReadI2C(bit);

sbit SCL = P2^0;

// connect to SCL pin (Clock) sbit SDA = P2^1;

// connect to SDA pin (Data)

//---------------------------------------

// Main program

//---------------------------------------

void main(void)

{

InitSerial();

// Initialize serial port putchar(0x0C);

// clear hyper terminal DelayMs(5);

WriteBYTE(0x0000);

WriteI2C('A');

//Write Data's Here WriteI2C('B');

WriteI2C('C');

WriteI2C('D');

WriteI2C('E');

WriteI2C('F');

Stop();

DelayMs(10);

ReadBYTE(0x0000);

EData[0] = ReadI2C(NO_ACK);

EData[1] = ReadI2C(NO_ACK);

EData[2] = ReadI2C(NO_ACK);

EData[3] = ReadI2C(NO_ACK);

EData[4] = ReadI2C(NO_ACK);

EData[5] = ReadI2C(NO_ACK);

for(i=0;i<6;i++)

{

printf("value = %c\n",EData[i]);

//display data */ DelayMs(100);

}

while(1);

}

//---------------------------------------

// Initialize serial port

//---------------------------------------

void InitSerial(void)

{

SCON = 0x52;

// setup serial port control TMOD = 0x20;

// hardware (9600 BAUD @11.0592MHZ) TH1 = 0xFD;

// TH1 TR1 = 1;

// Timer 1 on

}

//-------------------------------

// start I2C

//-------------------------------

void Start(void) { SDA = 1; SCL = 1;

_nop_();

_nop_();

SDA = 0;

_nop_();

_nop_();

SCL = 0;

_nop_();

_nop_();

}

//-------------------------------

// stop I2C

//-------------------------------

void Stop(void)

{

SDA = 0;

_nop_();

_nop_();

SCL = 1;

_nop_();

_nop_();

SDA = 1;

}

//-------------------------------

// Write I2C

//-------------------------------

void WriteI2C(unsigned char Data)

{

for (i=0;i<8;i++)

{

SDA = (Data & 0x80) ? 1:0;

SCL=1;

SCL=0;

Data<<=1;

}

SCL = 1;

_nop_();

_nop_();

SCL = 0;

}

//-------------------------------

// Read I2C

//-------------------------------

unsigned char ReadI2C(bit ACK_Bit)

{

Start();

WriteI2C(0xA1);

SDA = 1;

for (i=0;i<8;i++)

{

SCL = 1;

Data<<= 1;

Data = (Data | SDA);

SCL = 0;

_nop_();

}

if (ACK_Bit == 1)

SDA = 0;

// Send ACK else SDA = 1;

// Send NO ACK _nop_();

_nop_();

SCL = 1;

_nop_();

_nop_();

SCL = 0;

Stop();

return Data;

}

//-------------------------------

// Read 1 byte form I2C

//-------------------------------

void ReadBYTE(unsigned int Addr)

{

Start();

WriteI2C(0xA0);

WriteI2C((unsigned char)(Addr>>8)&0xFF);

WriteI2C((unsigned char)Addr&0xFF);

}

//-------------------------------

// Write 1 byte to I2C

//-------------------------------

void WriteBYTE(unsigned int Addr)

{

Start();

WriteI2C(0xA0);

WriteI2C((unsigned char)(Addr>>8)&0xFF);

// send address high WriteI2C((unsigned char)Addr&0xFF);

// send address low

}

//---------------------------------------

// Delay mS function

//---------------------------------------

void DelayMs(unsigned int count)

{

// mSec Delay 11.0592 Mhz unsigned int i;

// Keil v7.5a while(count)

{

i = 115;

while(i>0) i--;

count-;

}

}