How to Interface SPI-EEPROM with PIC16F – pic advanced development board
PIC16F/18F Advanced Development Board is specifically designed to help students to master the required skills in the area of embedded systems. The kit is designed in such way that all the possible features of the microcontroller will be easily used by the students. The kit supports in system programming (ISP) which is done through USB port.
Microchip’s PIC (PIC16F877A), PIC16F/18F Advanced Development Board Kit is proposed to smooth the progress of developing and debugging of various designs encompassing of High speed 8-bit Microcontrollers
SPI (Serial Peripheral Interface)
Serial Peripheral Interface (SPI) is a synchronous serial data protocol used by microcontrollers for communicating with one or more peripheral devices quickly over short distances. It can also be used for communication between two microcontrollers.
EEPROM
EEPROM (electrically erasable programmable read-only memory) is user-modifiable read-only memory (ROM) that can be erased and reprogrammed (written to) repeatedly through the application of higher than normal electrical voltage. It is a type of non-volatile memory. That can be used in computers and other electronic devices to store small amounts of data that must be saved when power is removed. For instance, calibration tables or device configuration.
Interfacing SPI – EEPROM
Fig. 1 shows how to interface the SPI-DAC to microcontroller. With an SPI connection there is always one master device (usually a microcontroller),which controls the peripheral devices. Typically there are three lines common to all the devices,
☞Master In Slave Out (MISO) – The Slave line for sending data to the master,
☞Master Out Slave In (MOSI) – The Master line for sending data to the peripherals,
☞Serial Clock (SCK) – The clock pulses which synchronize data transmission generated by the master, and
☞Slave Select pin – the pin on each device that the master can use to enable and disable specific devices. When a device’s Slave Select pin is low, it communicates with the master. When it’s high, it ignores the master.
These allow you to have multiple SPI devices sharing the same MISO, MOSI, and CLK lines.
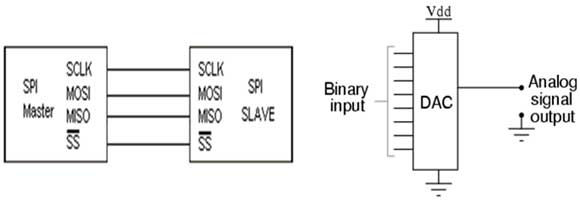
Fig.1 Interfacing SPI Etherner to microcontroller Fig.2 Block Diagram of DAC
The controller designed controls the EEPROM device through SPI protocol. The SPI Controller here acts as a master device and controls EEPROM which acts as a slave. The read-write operations are accomplished by sending a set of control signals including the address and/or data bits. The control signals must be accompanied with proper clock signals.
Interfacing SPI – EEPROM with PIC16F877A
We now want to Read, write and Erase EEPROM by using SPI in PIC16F/18F Advanced Development Board. Wiring up an SPI based EEPROM to the SPI port is relatively simple. The basic operation of the SPI based EEPROM’s is to send a command, such as WRITE, followed by an address and the data. In WRITE operation, the EEPROM to store the data.
In SPI, the clock signal is controlled by the master device PIC16F/18F Advanced Development Board. All data is clocked in and out using this pin.
These lines need to be connected to the relevant pins on the PIC16F/18F Advanced Development Board . Any unused GIO pin can be used for CS, instead pull this pin high.In PIC16F/18F Advanced Development Board Kit four nos. of EEPROM lines are controlled by SPI Enabled drivers. The SPI Lines Chip Select of CS (PORTC.0), serial clock of CLK (PORTC.3), serial input data of MISO (PORTC.4) and serial output data of MOSI (PORTC.5) connected to the SPI based serial EEPROM IC. The EEPROM read & write operations are done in PIC16F/18F Advanced Development Board Kit by using these CS, CLK, MOSI, MISO SPI lines.
Pin Assignment with PIC16F877A
Circuit Diagram to Interface SPI–EEPROM with PIC16F
Source Code
The Interfacing SPI – EEPROM with PIC16F877A program is very simple and straight forward.Read, write and erase operations in EEPROM by using SPI & the value is displayed in serial port. A delay is occurring in every single data read or write in EEPROM. The delay depends on compiler how it optimizes the loops as soon as you make changes in the options the delay changes.
C Program with SPI – EEPROM using PIC16F877A
Title : Program to read, write & erase of SPI – EEPROM
#include
__CONFIG(0x3f72);
//HS oscillator,BODEN,PWRT and disable others
#define FOSC 10000 //10Mhz==>10000Khz
#define BAUD_RATE 9.6 //9600 Baudrate
#define BAUD_VAL (char)(FOSC/ (16 * BAUD_RATE )) - 1;
//Calculation For 9600 Baudrate @10Mhz
//SPI lines #define CS RC0
//Chip select ON RC2
#define SI RC5
//Master Out Slave In
#define SO RC4
//Master in slave out
#define SCK RC3
//Clock /*SPI_COMMANDS*/
#define READ 0x03
#define WRITE 0x02
#define WRDI 0x04
#define WREN 0x06
#define RDSR 0x05
#define WRSR 0x01 unsigned char i,a,j;
unsigned char Msg[]="SPI TEST Program";
void Serial_init(void);
void SPi_init(void);
void SPi_WRITE(unsigned char);
unsigned char SPi_RDSR(void);
unsigned char SPi_READ(unsigned char);
void DelayMs(unsigned int);
void main()
{
unsigned char x;
TRISC=0xd0;
//Enable RX,TX pin and Set MISO as input TRISD=0;
//and set the remaining pins as output Serial_init();
//Setup the serial port SPi_init();
DelayMs(10);
while(!SPi_RDSR());
//SPI ready? SPi_WRITE(0x00);
//Send initialisation Command DelayMs(10);
while(1)
{
x=0;
while(x<16)
{
TXREG=PORTD=SPi_READ(x);
//ead byte from 25c040 and send via Usart ++x;
DelayMs(50);
}
}
}
void SPi_init()
{
CS=1;
//Make CS pin high SI=0;
//Clear input pin SCK=0;
//Clock low
}
unsigned char SPi_RDSR()
{
unsigned char Data=0x05; CS=0;
//Initiate transmission by pulling CS pin low for(i=0;i<8;i++)
{
SI=(Data & 0x80)?1:0;
//Send Read Status Register Command bit by bit(MSB) first SCK=1;
Data=Data<<1; SCK=0;
}
for(i=0; i<8; i++)
//wait for 0x00--device not busy
{
SCK=1;
Data|=((SO & 1)?1:0);
Data=Data<<1; SCK=0;
}
CS=1;
//Pull up return !Data;
}
void SPi_WRITE(unsigned char Addr)
{
unsigned char Data=WREN;
int AH=WRITE;
AH=(AH<<8)+Addr;
CS=0;
for(i=0;i<8;i++)
//Send Write Enable
{
 SI=(Data & 0x80)?1:0;
SCK=1;
Data=Data<<1;
SCK=0;
}
CS=1;
//Rise CS and pull down again CS=0;
for(i=0;i<16;i++)
//Send WRITE command and Addr
{
SI=(AH & 0x8000)?1:0;
SCK=1;
AH=AH<<1;
SCK=0;
}
for(i=0;i<16;i++)
//Send Data's
{
Data=Msg[i];
for(j=0;j<8;j++)
{
SI=(Data & 0x80)?1:0;
SCK=1;
Data=Data<<1;
SCK=0;
}
}
CS=1;
}
unsigned char SPi_READ(unsigned char Addr)
{
int Data=READ; unsigned char RData=0;
Data=(Data<<8)|Addr; while(!SPi_RDSR());
CS=0;
//Pull down CS for(i=0;i<16;i++)
//Send READ command and Addr
{
 SI=(Data & 0x8000)?1:0;
SCK=1; Data=Data<<1;
SCK=0;
}
for(i=0; i<8; i++)
//Read a Byte
{
RData=RData<<1;
SCK=1;
RData|=((SO & 1)?1:0);
SCK=0;
}
CS=1;
return RData;
}
void Serial_init()
{
TXSTA=0x24;
//Transmit Enable SPBRG=BAUD_VAL;
//9600 baud at 10Mhz RCSTA=0x90;
//Usart Enable, Continus receive enable TXREG=0x00;
//Dummy transmission printf("\033[2J");
//Clear the Hypherterminal;
}
void putch(unsigned char character)
{
while(!TXIF);
//Wait for the TXREG register to be empty TXREG=character;
//Display the Character
}
void DelayMs(unsigned int Ms)
{
int delay_cnst; while(Ms>0)
{
Ms--;
for(delay_cnst = 0;
delay_cnst <220;
delay_cnst++);
}
To compile the above C code you need the Mplab software & Hi-Tech Compiler. They must be properly set up and a project with correct settings must be created in order to compile the code. To compile the above code, the C file must be added to the project.
In Mplab, you want to develop or debug the project without any hardware setup. You must compile the code for generating HEX file. In debugging Mode, you want to check the port output without PIC16F/18F Advanced Development Board.
The PICKIT2 software is used to download the hex file into your microcontroller IC PIC16F877A through USB port.
Testing the SPI – EEPROM with PIC16F877A
Give +12V power supply to PIC16F/18F Advanced Development Board. The EEPROM device is connected with the PIC16F/18F Advanced Development Board. First check the entire EEPROM device fixed properly. A serial cable is connected between the microcontroller and PC. In PC, open the Hyper Terminal for displaying the values from EEPROM through SPI.
The Read & Write operations are performed in EEPROM with EEPROM address. When the EEPROM address is correct, then only you can write, read, and erase data’s correctly in EEPROM.
If any data is not coming in Hyper Terminal, then you just check the serial cable is working or not. Otherwise you just check the code with debugging mode in Mplab. If you want to see more details about debugging just see the videos in below link.
How to Create & Debug a Project in Mplab using PIC16F using Hi-Tech C compiler.
General Information
☞For proper working use the components of exact values as shown in Circuit file.
☞Solder everything in a clean way. A major problem arises due to improper soldering, solder jumps and loose joints. Use the exact value crystal shown in schematic.

